Monday, September 29, 2014

Grandpa

Hi Everyone!  It's Tami's turn at hosting the sketch challenge at MDS Monday!  She is looking for Vintage photos or at least a vintage feel to the page.  I have a lt of vintage photos.  For my Grandmother's 90th birthday my mom made a disk for all the guests at the party of all the old photos she has scanned into digital format.  This was such an awesome idea and I have used the photos many times and even made a photobook for Grandma that Christmas.  Here is a link to the photobook if you want to check that out, it came out great! 
So, for Tami's sketch I decided to use this photo of my Grandpa. My Grandpa has been gone for many years but he is always in my heart.  Love him!
Head on over to the MDS Monday site and see what the rest of the design team has come up with.  We hope to inspire you to give MDS a try! 
Here is the sketch! 


Thursday, September 25, 2014

Fall Leaves!

Are you thinking ~ Wait, this is Beth's Digital Cuts but there is a traditional card here, what's going on?  No, you are not in the wrong place, this is an MDS digital card!! I love using MDS to make hybrid cards with my traditional Stampin' Up! products and my digital projects combined! 


To make these cards I first opened a new greeting card project in the 5 1/2 by 4 1/4 landscape format.  I then designed the background of the card, leaving the other 3 card sides blank.  I like to print out 4 card fronts on one page, so that's why I leave the others blank.


 To print these out I click the share button, then the print button, and I get to this page.  You have 4 printing options and you can print 4 ways either using all four sides to fold the card from the one piece or make two cards folded in half or do like me and make 4 card fronts, which is the last option at the bottom.  As you make your choice you will see what that looks like in the preview panel, so I would recommend clicking through all 4 options and see what happens so you can get familiar with what you can do.

Next I open a new project in the 8 1/2 by 11 page size.  I added one of each leaf stamp and colored them in.  Once I had one of each colored, I simply copied and pasted as many as I wanted.


To make coloring the stamp easier I first change the whole stamps color on the page.  Then I click on the "coloring tool" to add my highlights. When you click on the coloring tool you will get this detail box.  You can zoom in on the leaf to do fine detail work or make the brush larger or smaller.   For this leaf I choose Crushed Curry for the base and then added a little bit of Tangelo Twist and Cherry Cobbler at the edges.  Once you are pleased with your work, click OK.


I printed all my pieces out on Stampin' Up's Naturals White cardstock.


Next I cut out my pieces and assembled the cards.


Thanks for stopping by today!  Please feel free to contact me with any questions!


Monday, September 22, 2014

MDS Monday #83 Text around the corner


Hi everyone!  Hope you had a great weekend!
And I hope you are ready for a new sketch challenge from MDS Monday! This week Cindy has a sketch for us as well as a challenge to use the "Text on a path" feature. 
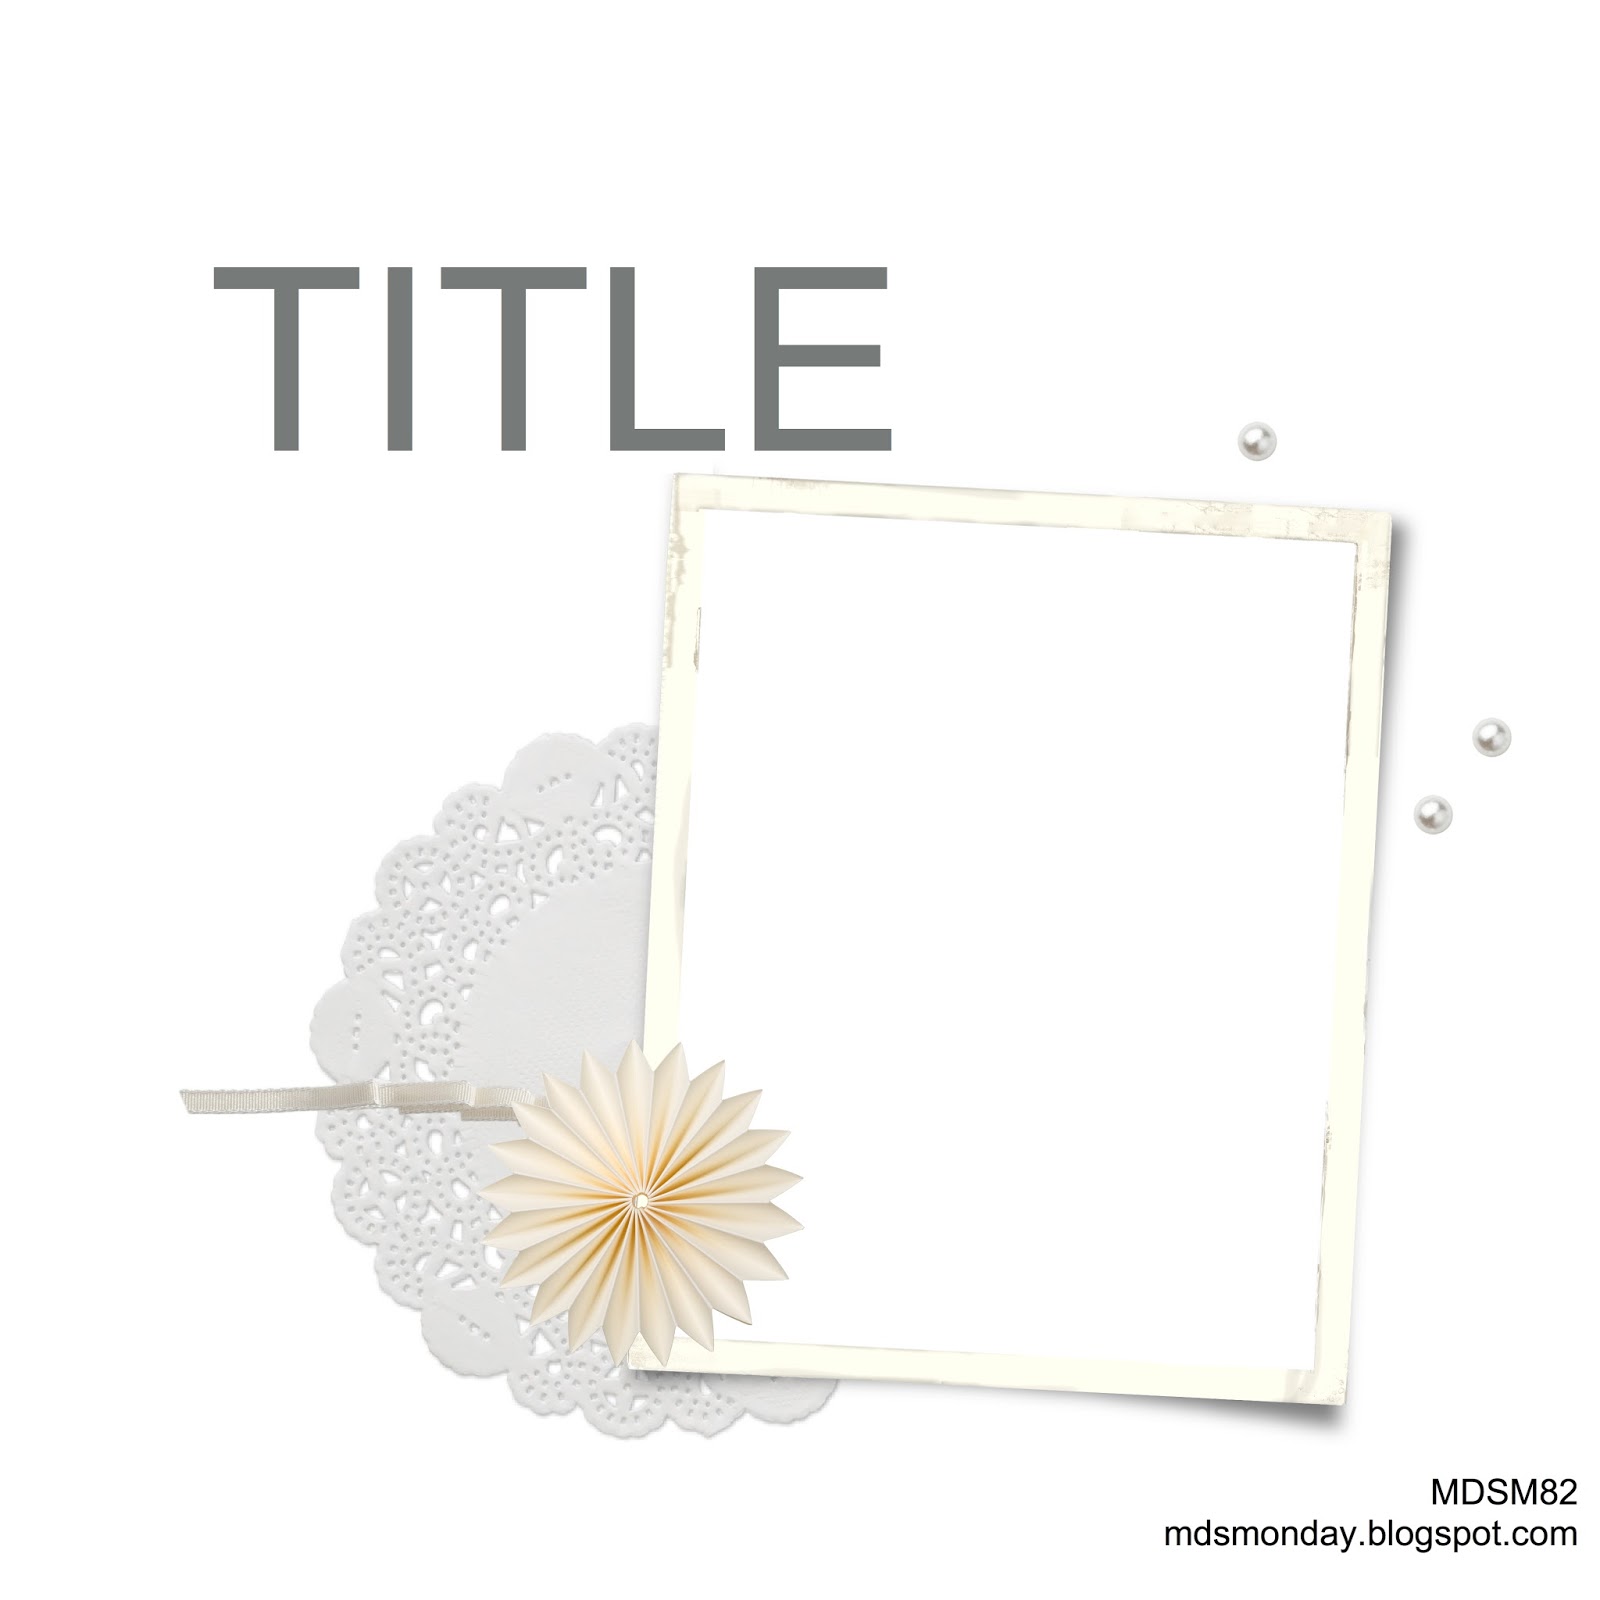


Here is the sketch.


Here are some close ups of the text.  There are several good videos on this technique at the mydigitalstudio.net site.  There are so many videos on it you should  maybe watch a couple to see which style works for you. Text on Path


When you add your "path" you need to click on the freeform tool, then click "add a line". 
Here is what you get.


You then need to insert a corner into your line to make it go around your photo.  To do this, click on your line to highlight it (it will turn blue).  Then click "insert point". 


You can then drag the end up or down depending on what you need.


Next type out your text box.  To attach the text to the line you need to select them both and then right click and you will get an edit box with a choice to "attach to shape". 


Now you have to do a bit of fussy work to get it just right.  See how the word "underwater is on top of itself?  not good. 


double click on your text and you will get this edit box.  Here you can change the spacing, or text size to make this look right.


Here I added some space after the "e" so that the "rw" didn't get covered.   But I still didn't like the break in the word, so I tried again.


Here I changed the spaces to after the word selfies and changed the font size a bit.


You can get rid of the line by either changing the line down to 0% opacity...


or right click to get the edit box and click the "Hide line" box.


I hope that you will give this fun way to add text a try!  And that you will head on over to the MDS Monday and see what the rest of the design team has come up with!  We can't wait to see what you do with the sketch!

Wednesday, September 17, 2014

MDS Monday # 82 card Version

Hi everyone!  I loved the soft pretty feel of my Little Ballerina page from Monday, so I decided to make a card version as well. 
Once again I am using the Project Life Love Story Download.  I can not say enough how much I love this download, and all of the Project Life downloads.  I think I may use Project Life digitally as much as I do the actual paper cards.  They are just so versatile.


 I know I showed some of the cards last week on my "Koala-ty time" page, but I wanted to show you a few more today.  The pictures below are the Stamps that come with the download.  I just love them and their soft hand-drawn look. The larger rectangles are great as overlays and can be resized to make fun backgrounds. 


Don't you love the pretty banners?  The doodle looking stems?  I do, so pretty.


The frames are great to highlight your journaling or photos.


You can see all the pieces to the Project Life Love Story download by clicking here.
Thanks for stopping by!

Monday, September 15, 2014

Little Ballerina

Hello everyone!  It;s MDS Monday time again!  I have a pretty page of my daughter Jillian getting ready for Ballet class. She has just started taking lessons and just loves to put on all her ballerina clothes, especially the shoes.  This page was made with the MDS Monday sketch #82 by Tara.  I kept the page pretty simple by using a card from the Project Life "Love Story" download.  These cards are so pretty and  make great backgrounds.  I changed the black and white into a pink with the re-coloring tool.  The card was a 4 x 4 embellishment which I resized into a 12 x 12 background. 


I hope that you will join us at MDS Monday this week and give Tara's sketch a try.  We would love to see what you come up with!


Friday, September 12, 2014

Koala-ty Time

I had to scrap this funny story about my daughter.  I had just used the Project Life Love Story download and so I decided to use that for my page.  The background is made from one of the 4 x 4 square cards enlarged to 12 x 12.  I then recolored it to elegant eggplant.  I added the sketchy looking frame and heart and my text box and that was it. So Fast and so cute!


Love Story Digital Project Life


Thanks for stopping by!!

Wednesday, September 10, 2014

MDS monday sketch 81 take 2


I decided to make another page with the sketch from MDS Monday.  I love to play around with different sketches and try them different ways.  It's so easy to kit delete when you don't like something.   I like the page from Monday, and I like this one too!  They wont be near each other in the album as these photos are almost a year older so I may just print them both.  For this page I used "lap of luxury" digital papers and the Project Life Love Story download stamps.  


In case you missed it yesterday, here is the sketch.


Lap of Luxury Digital papers. 


This is just a small sampling of the Project Life Love story embellishments.  click the link and then the magnifying glass to see more.


Thanks for stopping by!!


Monday, September 8, 2014

MDS Monday #81 ~ what do you love?


Hi everyone!  It's Monday!! time for a new sketch at MDS Monday and this time I am the hostess!  I hope you like my sketch this week.  It is all about highlighting something that you love.  I am recently back from a vacation to Sister Bay Wisconsin and I had a wonderful time with my kids and my mom so I choose to highlight my vacation.  Hop on over to the MDS Monday blog to see what the other design team member have created.  It's always fun to see how different people use the same sketch!  We  hope you will be inspired to give the sketch a try of your own.


Here is the sketch!


My page uses the Anchors Away June kit.


Thanks for stopping by!  I can't wait to see what you make!! Contact me with any questions you have! I am happy to help.

Wednesday, September 3, 2014

Project Life Seasonal Snapshots

Hi Everyone!  This week over at the MDS Monday blog we are working on pages that use a Project Life style format.  There are so many fun Project Life by Stampin' Up! downloads that it is so easy to find something to fit your needs.  For this page I went with a more traditional scrapbook layout but I used all Project Life by Stampin' Up! cards to make the page. 


These are the cards I used to make the page.  I enlarged the bus card so that the height was at least 12 inches to fit my page.  I then enlarged the pencils so that they would fill the area to the left side of the page for a fun boarder.  I used the "Back to school" square as a frame for my photos and the "Back to School" stamp for the title.
All elements of the page us the Seasonal Snapshots Project Life digital Download.  Take a look at all the  Project Life by Stampin' Up! downloads and click the magnifying glass to see all that you get with the download, there really is a lot! 


Thanks for stopping by!