Wednesday, January 28, 2015

Label your work

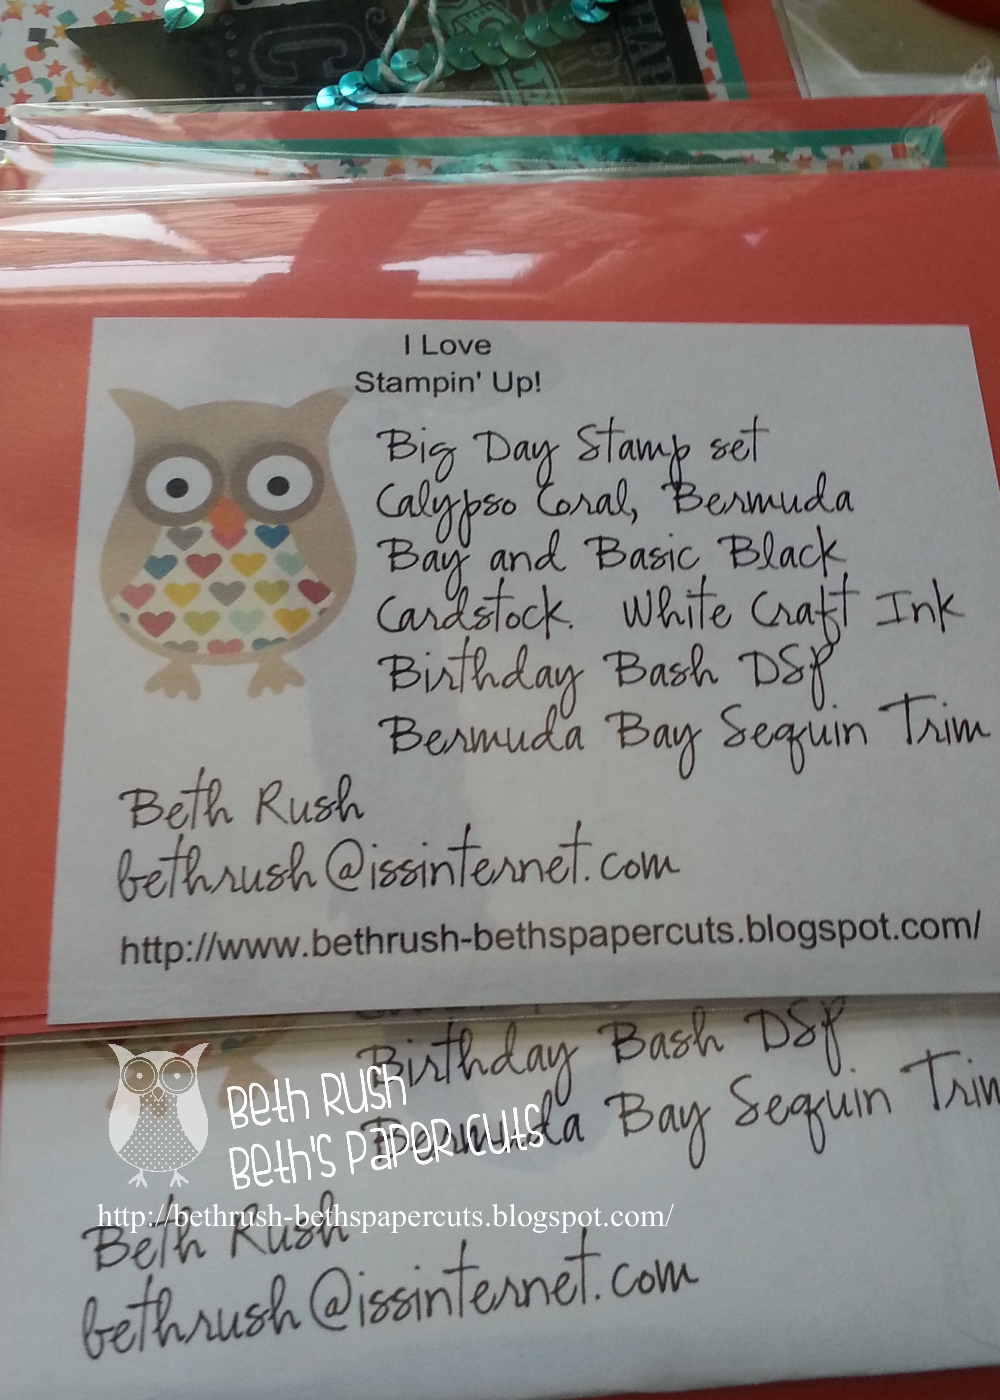
Do you participate in swaps?  I do, and I have found that I often have to make recipe cards or product info cards to include in my projects.  My Digital Studio is perfect for this.  I opened a new project page in  8 1/2 by 11 size.  I called it "card info".   I created a basic owl design, to match my blog headers.  That part will stay the same each time.  I also added a text box with my name, email address and blog address at the very bottom.  Then I added a third text box with the details of the card I just created.  This text box will change with each project, but the owl and personal info will stay the same.  I then copied and pasted the info as many times as would fit on the page, in this case 6 times.
 Each time I need to make a new swap recipe card, I just need to open up my "card info" project, and change only the details of the specific project in the text box, very simple.  


Then I just need to print out as many sheets as I need for my swap, cut them apart,  and I am good to go.


I have another version for just my personal info.  I use this when I create cards for craft fairs or other things like that.  It has my blog info and contact info.   


What other ideas can you come up with?  Customize some return address labels for your catalogs or personal mail, print them out on address label stickers when ever you need them.   There are so many ways you can use My Digital Studio besides scrapbooking or card making. I use it for flyers and display board headers all the time.  Do you sell items at craft fairs>  You can make up a variety of price tags and print them up as needed.  Punch out with the tag punch from Stampin' Up! for cute and quick price tags. 
Hope I have given you some ideas! thanks for stopping by. 

Monday, January 26, 2015

MDS Monday sketch #99

Hello everyone!  It is time for another sketch challenge.  This is sketch challenge #99 for MDS Monday!  Cindy has brought us a sketch using circles and stripes.  I choose to use papers from "12 days of Christmas".


I think this sketch lends itself nicely for a celebration!  Think of some birthdays or baby showers.  I'm sure you have something to celebrate. 


I hope that you will join us in this weeks sketch.  Take a look at what the rest of the design team has come up with by clicking here to go to the main MDS Monday site. We hope that you will link your sample to our page.  You can upload from your blog, but if you don't have a blog you can upload to other free sites such as mydigitalstudio.net or splitcoaststampsers.com, both have galleries that anyone can upload photos to.  Need help exporting your project to one of those sites, contact me and I will help you figure it out :) 

Thursday, January 22, 2015

Layered Punches

Hi everyone!  I thought I would share one more page where I used layered punches. If you take a look at the ornament you will see that it has many layers of paper.  I choose a couple striped papers for the top and bottom, a neutral to journal on and then some gold as a top.  I used the copy and paste in place technique that I talked about on Wednesday.  The sketch idea came from a Facebook group called "MDS Virtual Crop" that I participated in on Tuesday.  I love joining in on these challenges because it really helps get me started on a project.  you can get some great ideas at the MDS Monday Facebook page, or find our page on Pinterest and you will see all our past sketch challenges. 
Thanks for stopping by!


Wednesday, January 21, 2015

More punch fun


This is an old post, so some of you may have seen it before. I wanted to show it again since we are working with punches this week.  This page makes it look as though the punched heart is part of the background since there are muted paper strips behind it.  It is actually made up of 4 heart punches, and there are 4 paper strips behind it.  When you add a punch to a page the most common thing to do is to fill it with paper.  But, it is really fun to add multiple papers as I have done here.  You are probably used to copy and paste, but did you know that if instead of right clicking to do this, you can use the EDIT button at the top tool bar in MDS and copy and "paste in place"? This ensures that your punches are perfectly on top of each other.  To add multiple papers to your punch you can add the first punch, then add your paper fill.  Once you have done that, double click on your punch shape and you will get a new edit box.
  Here you can move the paper around to get the pattern where you want it, or in the case of my page here, you can move the paper until it is only covering part of the punch.  Then copy and paste in place another punch, it will come out the same as the first, with a partially filled area, now you can just click on the paper fill box and add your second paper.


Here the second layer.  Double click your punch to bring up the edit box again, and move the paper to only cover the area you want covered, then send it back a layer.


Here is the second layer now moved back.  repeat this process again by copy and paste in place another heart.  Paper fill it again with the third paper choice.


Here is the third layer. 


and here is the heart filled with three layers. 


I hope you will give this a try.  And if you haven't yet, why not play along with the punch challenge at MDS Monday this week? We would love to have you join us!

Monday, January 19, 2015

MDS Monday challenge #98 ~ Punches!

Hi Everyone! It's Monday!!  We have a new sketch for you are MDS Monday that I hope you will play along with.  We are filling punch shapes with photos.  This is an easy challenge that I hope you will take the time to complete because it will give you some insight into punches and ways to use them that you can keep tucked away for future use.  I attached a couple videos to the main blog post if you need some help getting started. 
You can see on my page that I used both a photo and some paper in my punch.  Sometimes you may have a hard time fitting a photo into your shape and you may not want to cut off someones ear, so adding a bit of background helps, as in my page.  Or you can even add multiple photos to a page, as Heidi did on our MDS Monday blog post.
Here is the sketch.  Feel free to use any punch shape you have.


Here is a page I did a few years back highlighting a whole year in one page.  I used an alphabet punch and filled it with multiple images.  Here is a great video for this page, which is where I got my inspiration. http://www.mydigitalstudio.net/video/creating-a-picture-collage-with-a-punch-in-mds2


I hope you will play along with our challenge this Week!!

Friday, January 16, 2015

Hello World

Hello everyone!  I decided to make a card with this weeks sketch from MDS Monday.  I used Watercolor Winter, which is on sale this week as a part of Stampin' Up's Weekly Deals. You can see more of what is part of this download on Yesterday's post.  For some reason only the embellishments show up at the Stampin' Up store site.  I also used "hello World" which is one of my favorite baby downloads. 


As  you can see I did not follow the sketch exactly, but that's OK.  One of the great things about sketches is that they are a jumping off point, a way to get started. 


Thursday, January 15, 2015

Weekly Deal ~ Watercolored Winter

Hi everyone!  I wanted to be sure that you saw this weeks Digital Deal from Stampin' Up!  It is the Waterolored Winter digital kit. This is a really pretty download that I have used many times, and not just for winter! 
The papers are so soft and pretty, and with the Re-Color feature you can make them any color you need.  I think the washes would work great with a beach themed page!


These are some of the embellishments


Here are some of the stamps.


Here is a page I made with this download last winter.  I used the large overlay stamp on the whole background, as well as the snowflakes and "Winter Wonderland"


This page used the papers from this kit, but recolored to match my daughter's ballet skirt.


Stampin' Up! releases a new Digital Deal each week on Tuesdays, so be sure to check in and see what's on sale!  This kit is only $5.97 this week, normally $9.95!
Thanks for stopping by!!

Monday, January 12, 2015

MDS Monday #97

Hi everyone!  It's MDS Monday time again and this week Anita has a fun sketch for us.  I choose this picture from this past October when my nieces were visiting with us.  We visited Cantigny park, a family favorite.  This is a fun sketch to highlight just one photo but feel free to add a second photo where I have the journaling box.  You can then add your title and journaling in the left top corner. 


Here is the sketch!  I hope that you will play along with our sketch!  You can see what the rest of the design team created by clicking here and visiting the MDS Monday site.
Add your photo to our challenge page by posting it to facebook or the www.mydigitalstudio.net ( a free mds site) and then link to our site with the linky tool at the bottom of the post.  We would love to see what you come up with!


For my page I used the Fall Memories download


Wednesday, January 7, 2015

Fun Printable for my craft room

Hi everyone!  Since we are using chalkboard elements this week I thought I would share a fun printable I made for the wall of my craft room.  I think it will be very cute in a funky frame on the wall.  I have to admit that room is usually the messiest in the house :(
Maybe that will be a good New Year's resolution, to keep my craft room organized!!
Thanks for stopping by!!


Monday, January 5, 2015

MDS Monday challenge #96 Chalkboard

Hi MDS Friends!  It's MDS Monday time again and we are using Chalkboard elements on our pages. There are so many fun chalkboard backgrounds in MDS.  I have used the "Back to school" kit here.  Another favorite of mine is the Convention 2012 download.  You don't have to go to Convention to use these fun downloads, I think I have them all, they are always so much fun. 
This is a page I made for one of the Bus drivers at school.  The PTA gave him a nice retirement gift and wanted a framed photo as well.  I hope that he liked it. 


Here is a little bit of what the Back to School download looks like.  The ensemble comes with some page templates and card templates, as well as some really fun papers.  click this link to check it out.


You can find some really fun Chalkboard style fonts online too.  Here is a list of some favorites I found on Pinterest.   The page below was created by another Stampin' Up demo and she used swirls and stamps from the above mentioned Convention 2012 download, there are fun hand drawn frames and banners too!
Just type in Chalkboard fonts at Pinterest and you will get TONS of ideas.  http://www.pinterest.com/search/pins/?q=chalkboard%20fonts&term_meta[]=chalkboard|typed&term_meta[]=fonts|typed


Hope you play along with us at MDS Monday!