Pages

Friday, March 29, 2013

Scrap Map 4

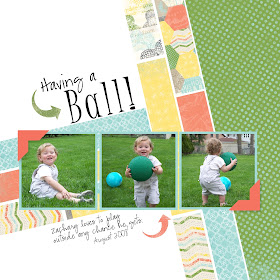
Like yesterday's Lego page, this one has a lot of white space too.  I really like the look of a white background sometimes. 

I originally had this page finished, except the text box, because I couldn't decide on a font (sometimes that's the hardest part!!). But then Tuesday morning came around and the new downloads came out, and I just had to switch the papers.  Luckily this is a digital page, so switching papers is just a click away.  I love the green and blues in this paper.  It looks so nice with the grass.  
This page is for the Scrap Map 4 challenge over at Mydigitalstudio.net  


Here is the Scrap Map.   A fun layout, I think.  I have a tip for you when you are trying to copy a page layout.   Click on the image of the template. Save the image as a picture.  Then, when you open MDS, add a photo box to your page and size it as the whole page, for example, on this page I would open a 12 x 12 page, and add a 12 x 12 photo box.  Then plunk the template picture in the photo box.  Add your punch boxes and photo boxes right on top of the picture.  This way you know where to put them, what size, what angles, etc, and you don't have to keep minimizing your work to look at the template.  When you have all the elements on the page, delete the 12 x 12 photo.   Add your background page last so you don't cover up your template photo.  Did this make sense?  Its easier to show than explain.  I learned this from another Stampin' Up! demonstrator named Martha Inchley.  So clever of her!
On this example, I added a scrap map to the open 12 x 12 page.


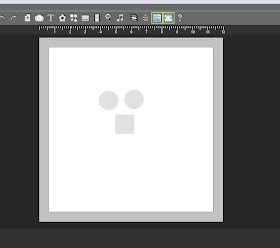
Here I have started to layer the punches onto the page.  You can leave them grey while you are working, I added papers so that you could see them better.


Still adding elements to the page. 


When you are all done, click on your layers button.  That is the one that looks like this..
Then the box on the left will pop up.  Your photo should be the very bottom layer.  drag it up to the top layer, then click OK.  Now you can simply click on it and delete it.


Thanks for stopping by!!  As always, let me know if you have any questions, I am happy to help.

Thursday, March 28, 2013

A very Lego Birthday!

I am embrassing the "White Space" on this page.  I like the way a page looks with a white background sometime.  It can really make the elements POP.  These picutes are from Davids 6th Birthday, when the Lego obsession began.   This page was inspired by a party invitaion I saw on Heather Summer's blog.  Super cute!  I picked up that Lego font over at Urban Fonts, it was free! YEA!  And with my Lego crazed kids, I sure wanted that font.  Even my daughter Jillian loves Lego.


I made those Lego bricks with, you guessed it, Punches! Punches are my Go To tool in both the paper world and the Digital world! 
You start with a square and make it twice as long as it is wide.  You also need two circles.


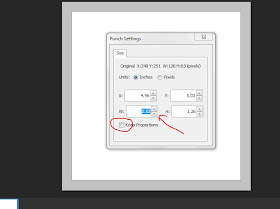
To edit the square into a perfect Lego brick, I used the editing tool.  The first one I made I just stretched the square, but David told me that Lego is always exact, I guess they would have to be for the bricks to work together :)  So, I redid my rectangle by right clicking onthe square to get the edit box. Then I went to the "W" and "H" (width and height) areas to make one of them double in size.  You need to "unclick" the "keep proportions" box, or you'll just get a bigger square.
Next you need to resize your circles.  I colored them in so that I could see them better.  once you get one the size you want, you can right click on it to get your editing box, then see what size it is.  Then right click the second circle and edit it to that same size.  Line them up on your rectangle. 


To make sure your circles are perfectly aligned, use your align button at the top tool bar. You need to click on one circle, hold down the shift key to click on the second circle, then they will both be highlighted.  click on the align button and choose either align right or left. Then, now that they are nicely aligned, group them into a pair.  Now just copy and paste the pair three more times so you end up with four pairs.


Now I played around with the shadows.  Click on the drop shadow button.  You can see the sliding scales.  I pulled the Blur to a bit past medium.  them hover your curser over the circle image, you can see how the shadow moves around with your curser.  I moved it until it was just peeking out at the top, but still mostly at the bottm right.  You can also click on the square that says "apply to all punches on the page.  This way you don't have to repeat this step 7 more times.
Another little box will pop up when you choose to apply the shadow to all the punches on the page, just to be sure.  click ok.
Now recolor you rectangle, but your circles on top and group them all together.  I added a whole bunch to the page by copy and paste.  Then I rotated some this way and that, and recolored them in a few traditional Lego colors. 
I hope you like this project.  Why not try playing around with some punches and see what you can create!  Have fun!!
As always, contact me if you have any questions!!


Tuesday, March 26, 2013

Everything Easter kit to the rescue!

The Everything Easter kit is full of fun decorating ideas for your Easter table.  It includes treat baskets, place cards, napkin rings, and more.  Item #129363 for $14.95.  You get an 18 piece stamp brush set, including the "Every bunny" stamp set (love that one), 9 papers, 30 embellishments, card templates, basket templates and cute egg decorations. 
Here is what I made so far. 


Place cards.  You can print them, cut them out, and use as is. Or, attach them to some matching cardstock.  Add some ribbon or a button to dress them up.  I think they are pretty cute as they are, and will get tossed after dinner, so I am going to leave them. 


The baskets come together pretty easily.  I did manage to make a boo boo though.  I was going too fast and forgot to remove the instructions from the basket before printing. 
 
See?  Silly me.  Luckily I just added a cute scallop image and now you can't see it!
Cute!  The Scallops fit the Stampin' Up! scallop punch if you print them as is without resizing. I made a whole page of the cute scallop images to use on my baskets, my napkin rings, and as cup cake picks.


A few tips...
The basket will look like this when  you open up the template.  click on the basket image to get rid of the instructions written on the basket.
I moved the instructions overlay so you can see what I mean in this picture. You can click and delete the title on the page too. 
Once you just have the basket and handle on the page, you can move it up a bit, and copy and paste another one.  Copy and paste the handle too.  Now you can print two baskets on one page.  Use a heavy weight paper, not printer paper :)  I use the Stampin' Up! whisper white cardstock. 
 
To quickly make more of the scallops. I opened the belly band template page and deleted the bands.  Next hold down your shift key and drag your cursor over the images to highlight them all.  Now go to the "Arrange" button and "Group" them together. 
Now that you have the images grouped together, you can copy and paste more onto your page. 
 
Stampin' Up! has other cute Easter Ensembles for My Digital Studio as well.
This is the Celebrate Easter Ensemble #133474  $12.95. 
The great thing about buying digital is that you don't have to wait for delivery, you can download it now.  No shipping or Tax either. 
If you don't have My Digital Studio, you can try it free for 30 days, just go to my online store and download it, or buy it for only $19.95!! 
As always, contact me with any questions! I am happy to help.


Monday, March 25, 2013

MDS Monday #10

Here is my project for the 10th MDSM Challenge!  And this time, I am not just playing along, I am part of the Design Team! Yea!  This challenge was brought to us by Joan.  It includes a Two-Page Sketch as well as a design element challenge.  You can do one or both of the pages, and try to include the design element of adding a floating Frame on one of your photos.  This draws attention to the photo, highlighting it.  I added a frame around Zachary's face as he looks at his cake.  He LOVED it, and I hope you can see that in his face.  I "stuck" the frame on with Digi tape and a digi clip, fun elements for a kid page.  I used the Celebrations kit for my page, also perfect for kid pages.  The kit comes with lots of
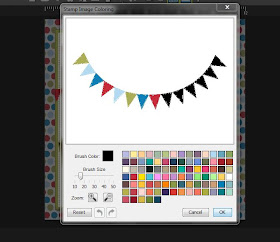
papers and fun labels and borders to use.  It also comes with the pennant stamp.  I colored the stamp by using the coloring tool, a fun new element in MDS.


The clips are item #132273  $1.95.  Super cute! There was even a bike shape!  The Balloons and that cute #3 candle are from the Patterned Party stamp brush set. #127430 $7.95


To color a stamp click on the stamp you want to color.  Then click on the "coloring tool" on the right side of your screen. This will open up the stamp image in a new box.


This is what the coloring box looks like.


There are great ways to make this easy.  You can click on the Zoom button to make the image larger, easier to color.  You can make the brush size larger or smaller to color large or small areas.   When you open the coloring box, you will see the standard Stampin' Up! coloring pallet, but don't worry, that's not all.  If you click on the square marked "Brush Color", you will get a bigger selection, including the "Picker" tool, which lets you pic colors straight from you photo or page.


Here you can see the box that appears when you click on the brush square.  The bar at the top has the picker tool, the RGB spectrum, and more.


I also cropped the pennant on my page.  You click on the stamp you want to crop, then this box will appear.  Drag the little drag squares to where you want them.  Then click "OK". 


The pennant stamps I used are included in the Celebrations kit! #123728 $9.95
The kit also comes with a two page 12 x 12 spread template, as well as two greeting card templates.
I hope you like today's page.  Why not give cropping and coloring some stamps a try?  If you do, send me a picture, I'd love to see it.  And, my fabulous MDS Customers- you know who you are -  upload some of your creations on the mydigitalstudio.net site. I would love to see what you are doing with MDS!!  And, if you upload there, send a link to the MDSM site to and do one of our challenges!
 
As always, contact me with any questions!  I am happy to help!!


Thursday, March 21, 2013

Princess Play Date

I used the same template as the post on Monday.  It was a challenge from the MDS Monday site.  The challenge was to use Subway Art in your page.  Subway Art is sort of loosely defined as different fonts and words on the same topic.  For this page I used words to bring about thoughts of a girly play date.  Some of the words were stamps from some downloads I had, but a few of them are text boxes that I made myself, and changed to my favorite fonts.  I used the color picker tool to match the font colors to the colors in the stripes running down the side of the rectangle punch the holds the words.  The papers and hearts and things are from a newer download called "Hello there".  Its a really cute kit. 
See how cute!  Its item #133374 for $9.95  13 papers, 17 stamps and 26 embellishments.

Here is the sketch from the challenge.  I changed it up a little bit because i wanted to add the three pictures of the girls.   Why not give it a try?  Send me a picture of your page if you do!
 

Wednesday, March 20, 2013

First lost tooth

Zachary was so excited to lose his first tooth last week!  I know, an odd thing to be happy about, but his kindergarten class has a chart hanging up and he was worried that he would be the only kid with out his name on the tooth chart before school gets out in 2 1/2 months.   For this page I used the new Seriously Teen kit.  Zachary is just 6 but I really think the papers in this kit are really nice for those hard to scrap boy pages.  The colors are rich and the patterns perfect for teens and little boys too.


Add caption
  You get a 12 by 12 page template, 38 stamps, 12 papers and 23 embellishments!  item # 133475 $9.95    In the picture is shows the "nineteen" stamp, but there is eleven through nineteen in the kit.  The word bubbles are great too!   
As always, feel free to let me know if you have any questions!

Sunday, March 17, 2013

My Lucky Charm

It's hard for me to believe this is the same girl in the photo from two weeks ago!!  We brought her home from the hospital 4 years ago today. She is such a sweetie.  As the song goes...
When Irish eyes are smiling,
Sure, 'tis like the morn in Spring.
In the lilt of Irish laughter
You can hear the angels sing.
When Irish hearts are happy,
All the world seems bright and gay.
And when Irish eyes are smiling,
Sure, they steal your heart away.

For this page I used the template from the MDSM challenge #9! I copied the idea from a talanted MDSer named Yapha, here was the inspiration.    I used lots of stamps from the Lucky Frameable template.  It came with lots of fun St. Patrick's Day type words in many fun fonts.  Here is a picture of that Frameable, item #129930 only $1.95!!  Super cute.  Frame it as is or add a picure, or use the words like I did to make your own frameable picture! 
Check out MDS Monday for more pages made with this template!  And, go back and look at past challenges to get even more inspired!
Thanks for stopping by!!

Saturday, March 16, 2013

I'm on a Roll!

My St. Patrick's Day Leprechauns were the challenge winner on theMy Digital Studio site today!  yippee!  And I saw a picture of them on the Stampin' Up! customer home page too!
 
It was so nice to win a free download!  Why not give it a try too?  The next challenge is Easter Projects.  They need to be Uploaded by noon on March 29th.  
I had quite a crazy week, and have no new projects to post :(    My Daughter turned 4 this week and we had some little friends over for a princess play date, so there will be lots of cute pictures to scrap!  And Zachary had a field trip and lost his first tooth!  I hope to have some pages up early next week!  Until then I hope you enjoy your Sunday! Happy St. Patrick's Day!  

Monday, March 11, 2013

Yea! I was the MDS Master this week

I was so happy and surprised to see that I was picked as the MDS Master this week!  I really enjoyed the sketch, so I was glad people seemed to like my page!  Check out this weeks Challenge!  And, while your at it, why not go back and look at past challenges?  I think sketches are such a great way to start a page, they are a perfect starting point. 
Here is the new challenge...
Subway Art.  Subway Art is using different sizes and fonts of related words to create your design.  There is also a sketch to use too.
Stampin' Up has several Subway art type templates available as a download if you need some inspiration. 


My favorites are the Toxic Frameable (item #128139 $3.95) and the Homemade Happiness Frameable (item #132192 $2.95)  I printed them both out and they decorated my house during Halloween and Christmas.  I used them both as framed art as well as card fronts and tags.  You also get the separate elements from the pages too.  For example, in your templates you see the whole page, but in your stamps you will get things like the pumpkin, cat, bat, spiderweb, all the words and more.  Very cool, and a low price!


I better get started on creating my own for this weeks MDS Monday Challenge.  I think I will use the sketch and a photo.  There are lots of possibilities with this one!
Oh yea, I made one a few weeks back that you can check out too, this one was for my craft room.