Hi everyone! I was thinking about Santa being back at the mall already and looked up older pictures of the kids with Santa. Here are Jillian and Zachary last year. When I finished the page I liked how it turned out, but wished that the trees matched the green background of the photo. The trees are embellishments, not stamps. Then, I remembered that we could recolor embellishments now with My Digital Studio 2! YEA! So, I used the recolor button, but it just gave me the standard Stampin' Up colors. I noticed a "more" button at the left, so I clicked that, and happily it gave me a "Picker" option. I picked some different shades for the photo to recolor the trees and now I as super happy with the end result!
Here is how it looked before recoloring. Also cute, but hey, if I can add more steps I'll do it :) At least that's what the ladies at class say!
Tuesday, November 13, 2012
Friday, November 9, 2012
New Blog Headers!
I made some fun new blog headers last night! I used the digital owl punch, so cute. For the first on I used him as is. I added a cute Santa hat for the season and a candy cane striped shirt. The little snowflakes complete the scene.
![]() |
On my paper crafts blog I changed the header too, but I made the owl into a turkey for Thanksgiving. He took a few more steps.
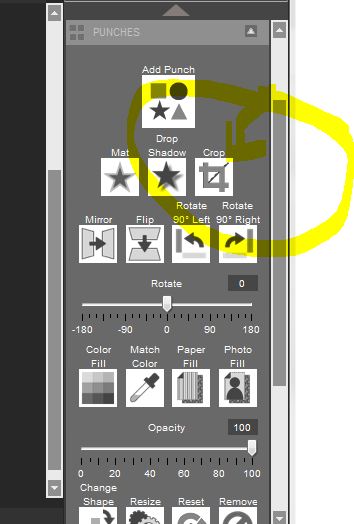
The circle then appears over your owl. Move the circle around so that it cuts off the ears and expand it all the way to the bottom of the owl. His feel get a tiny bit cropped but that's OK. click the OK button and color him a shade of brown. I choose Chocolate Chip.
You should now group all your elements so that you can move them all around as one piece.
Now add your turkey feathers. In my header I used the Rosette Embellishments, so I thought I would show the blooms this time. Add your blooms to the page, then crop in half. Do this with as many colors as you like. You can use the recolor tool to change the colors if you need to.
Wouldn't these make cute table place cards?
Thursday, November 8, 2012
Added some pictures
I have added some pictures to my Halloween page, so I thought I would post it again now that it's all done.
Wednesday, November 7, 2012
Carving Pumpkins and more free fonts!
It was so much fun to carve pumpkins with the kids. This was Jillian's first time. She did a great job and was not squeamish about the pumpkin guts. She said they were slimy but fun. Zachary did the whole thing by himself with child safe pumpkin carving knives. David made a double sided pumpkin with a scary side and a traditional side. They all made a huge mess but it was a lot of fun. I used the toxic frameable stamps for this page, they are just so fun for Halloween. I also used Howlstooth ans Scaringbone paper. The cute frames around the papers were from the free downloads we were given for world scrapbooking day! Love them. And, isn't that font cute? I found it on Pinterest. Here is a link. It was free! 
Thanks for stoping by!!
Tuesday, November 6, 2012
Maggie page
I signed up for another one of Heather Summer's classes on My Digital Studio. I always enjoy them and find that they are worth every penny. This time she has teamed up with another My Digital Studio master, Martha Inchley, who's projects I have noticed online and always found amazing. The class just started on November 1st, but you can sign up any time and jump right in. Class goes for 30 days, but the website is open for much longer, I think about 3 months if I remember correctly, so you have plenty of time to do the projects at your own pace.
Check Heather's blog here or Martha's blog here for details.
This page was a sketch challenge from them today. The original page sketch was for Christmas, but I changed it up a bit for an any day theme. This is my niece Maggie, I really liked this picture, it was taken by her friend Natalie Caswell, only 15 and a very talented photographer. I had to make a page for it. Hope you like it.
Thanks for stopping by!
Saturday, November 3, 2012
Last Day to get your free downloads!!
Today is the last day to get your THREE Free Downloads and 50% off digital Kits!
And, if the goal of 18,000 downloads is reached, we will all get a forth download free as well!! The free downloads are really cute and can be used as clip art in other programs even if you don't have My Digital Studio.
And, you can try My Digital Studio Free for 30 days!!
Visit MyDigitalStudio.net for more details.
And, if the goal of 18,000 downloads is reached, we will all get a forth download free as well!! The free downloads are really cute and can be used as clip art in other programs even if you don't have My Digital Studio.
And, you can try My Digital Studio Free for 30 days!!
Visit MyDigitalStudio.net for more details.
Thursday, November 1, 2012
Paper Bows
I was intrigued by the "That's a Wrap" digital kit that is on sale this week and decided to go ahead and get it. The kit comes with some templates for bows and while I didn't want to use the colors in the template, I printed them out onto some cheap printer paper in grey scale, and then traced the pattern out onto paper that I did want to use. They were very big! So, I went back in and group the elements and re sized them. That worked perfectly. I cut out my new pattern and made my bow. Cute! I put a wooden button in the center and attached it to my box. The template comes with two bow styles.
The kit comes with the bow parts as punches as well, so you could paper fill with any patterns you want and print and cut them out all in one step. The kit at regular price may be a bit high priced for what you get, but at half off it was worth while to me, and I'm sure I'll make more of these cute bows!
Subscribe to:
Posts (Atom)


.jpg)