Pages

Monday, October 28, 2013

MDS Monday #38


Hi everyone!  It's Monday and that means its time to share the MDS Monday sketch with you!  This week we have a card sketch by Tara!   I went very bright with my take on the sketch.  I have been using a lot of vintage or grunge or rustic looking papers and accents lately, so I decided to go bold this week.  I used papers from the Anchors Away download kit, which is loaded with great elements by the way.  Head on over to the MDS Monday site and see what the other design team members came up with.  I love how everyone goes in different directions, it really highlights all that you can do with MDS!


Here is the sketch!


 And here is the Anchors Away download!  Lots of great papers here!  I also have a hint for you.  When making a card or smaller project in MDS, I noticed that when adding a background paper to the project, I couldn't manipulate the paper to get the section I wanted.  Sometimes a paper has a large pattern and I want to be sure a certain part shows up in the background.  When you add paper to a punch, you get to move your cursor around on the paper until you get the part of the paper you want to appear in the punch area.  So, if the paper I want to add to my card has an area I want to  highlight, I add a punch the size of the card so that I can move the paper. 


Here is what you get when you add the paper as a background paper.  I wanted more of the sunburst to appear, basically using the right lower corner of the paper.  Because I added the paper as a "Background paper", I can't move it around.


By adding the paper in a punch, you can zoom in and out, and also move the highlighted box around until it looks the way you like. 


Thanks for stopping  by! Now head on over to the MDS Monday site and see what you can do with the sketch!

Thursday, October 24, 2013

Placemats!

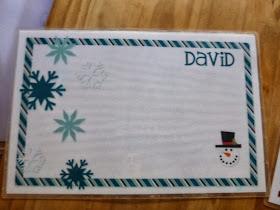
Hi everyone!  It's the second week of the MDS Blog Hop!  Fun!  I hope you have been checking them out.  This week we are showing "what we are working on".  I am working on place mats.  I love the custom sizes feature in  MDS and have used it often when making items to have printed out at specialty print shops or office supply shops.  Have you checked out this feature?  When you open a project in MDS, you have the option to choose from a selection of pre-sized pages or cards, but you can also click "custom" and choose the height and width of your project.  My husbands has a printer in his office that prints 11 x 17 for plan drawings, so I use this size often.  It is the perfect size for place mats!  You can keep the place mats paper only, and consider them disposable, a fun idea for a class, with places for customers to take notes, or a business meeting.  You can also print and laminate this size at places like Staples, Office Max, or Office Depot.  They have two different thicknesses of laminate, I go with the thicker.
 
This is what the custom size options screen looks like.  Enter your desired width and height, then click "create project".
I have also used the custom size option to print out Avery labels to decorate bridal shower favors and to make custom notebooks at Vista Print.  There are so many options out there, check out the print options at the Office supply stores near you, or online shops.  If you are a business person, you can create custom notebooks, binder covers, and more.  Moms can make all sorts of things for the kids.  Chore charts, menu planning, behavior charts, homework charts, and Place mats!!   
It was really easy to print the place mats out.  We are running low on ink so I had them printed at Office Depot.  I save the project to my desktop, then inserted a flash drive into my computer and copied the projects to the flash drive.  I took it into Office Depot, and they printed and laminated them for me in about 15 minutes!  They offered me standard paper or heavy weight card stock.  Because I was going to choose the heavy laminate, I had them printed onto standard paper.  If you are going to print both side, the heavier weight option is better.  And, after I was there and he offered me the heavier weight, I realized I could have made a two sided project, maybe something for the kids to color on the other side, with dry erase markers?  Next time I will make a double sided place mat for sure!! While I waited I browsed the aisle where I found some cute office supplies. 


  Here are some other place mats that I have made.  This one is for Zachary to practice his handwriting.


We get out the place mats for eating, drawing, watercolors, and playdough.  They get a lot of use in our house. Why not give them a try?
Thanks for stopping by today! I hope I have inspired you to make some custom sized projects! 


Tuesday, October 22, 2013

Wicked Fun Download

Each week in October Stampin' Up! has been offering a weekly deal to celebrate their 25th anniversary.  This week they are featuring a fun Halloween download that I love, and unfortunately already have so I can't get the awesome price.  But, You can!  The Wicked Fun Kit is on sale for just $4.98 this week!  I really like the papers in the kit, and the fun bats!  Just in time for Halloween! 
Also, I just learned that print products will be on sale starting October 29th and going through November 30th!!  So get working on those pages or calendars so you are all set to print all your Holiday cards and gifts with MDS!  YEA.  I have actually been waiting for a print sale.  I have a Hawaii book to print, as well as some swatchbooks I made of my Christmas cookies, and a Calendar I made for a gift.  SU! had a sale like this last year, so I was hoping they would again.  I haven't printed a page since July, so I have quite a bit saved up.   You've got a month, so get to work on some great gifts!

Monday, October 21, 2013

MDS Monday #37


It's MDS Monday once again!  This week Joan has a page sketch for us.  This is a great sketch for those events that have many photos you want to use.  You can take this sketch in so many directions.  I went super casual and simple.  Head on over to the MDS Monday site and see what the rest of the design team came up with.   Then, see where the sketch will take you.  We can't wait to see what you come up with!


Here is the sketch!


Thanks for stopping by!

Wednesday, October 16, 2013

Masked Mess


I was just playing around with some of my favorite Halloween Downloads from Stampin' Up!  There are a ton of fun Halloween downloads, its hard to pick  a favorite.  I think if I had to choose one it would be the Toxic Frameable.  Such a deal for the price, you get loads of stamps, including a fun background overlay.  I also love the papers in the Wicked Fun Download!  This page uses a fun mask from the "Last Minute Masks" download. 


Check out some more Halloween Downloads here...
http://www.mydigitalstudio.net/profiles/blogs/our-favorite-things-halloween

Monday, October 14, 2013

MDS Monday #36

Hi all!  I am the hostess over at MDS Monday this week!  Yea!  I have a card sketch for you today, but you can try it out as a page sketch too if you like.  Once again I have used the Fan Fair download on my project, I have been using it A LOT lately.  I also added a bit of the fun new Burlap download, love that for fall!  The stamp is from the "Hello there" download.  I have you like my card and are inspired to give the sketch a try. 
And, I hope you will jump on over to the MDS Monday blog and see what the other team members have come up with!
Here is the sketch.....
Thanks for stopping by!!

Thursday, October 10, 2013

Place cards

Hi everyone!  I have a fun project to share with my MDS friends today!  I made these Thanksgiving place cards for the MDS Blog Hop that I have joined.  They are very pretty and I think they will look lovely on my table.  I started out by opening an 8 1/2 by 11 page on my computer.  I then added a punch in the size I wanted, in this case 2 by 4 1/4.  I then designed the place cards in that punch space.  If this is too small for you to work with, zoom in your page.  Once you like how your card looks, group it all together and copy and paste it as many times as you need.  Here is a hint: if you are going to cut them out and mount them, I wouldn't use a mat on the punches.  It's much easier to cut them out without the mat and you'll save yourself a lot of headache.  I do however usually use at mat while I'm working, it just seems easier to visualize what it will look like printed.  Once I'm finished, I just get rid of the mats.   Then just add a text box with a persons name in each place card.  I used a font called "Simply Glamorous".  What do you think of how I colored the leaves?  I zoomed into the leaf image to color it, and on my screen it odd with the splotches of color.  They seemed to circular.  Once I zoomed back out, I think they look pretty good.


I cut out my place cards and mounted them onto Early Espresso card stock.  I did the same process to make some signs for the dessert table. 

Thanks for stopping by today!  I hope I gave you some ideas on how you can use My Digital Studio to make your Holiday tables special!

Wednesday, October 9, 2013

MDS Blog Hop

As many of you know I really love creating with My Digital Studio.  I have been working with the MDS Monday team to bring fun sketches to you each Monday, I hope you have enjoyed them.  Well, now I will also be participating in the MDS Hop as well.  The MDS Hop is a group of MDS users who post projects to there blogs twice a month, linking the blogs together so you can hop from blog to blog to get some fun MDS inspiration!  The First time I am participating is on October 10th, so check back to see my project.  I will be posting it to my "Beth's Paper Cuts" blog, as that gets viewed a lot more and I am hoping to get some non- MDS users to think about becoming MDS users.  I will add some here as well, and give some more details or tips and tricks if needed.  Don't forget to check back and hop along with me on the MDS Hop!!

Tuesday, October 8, 2013

Sketch take 2

I decided to revisit the sketch from MDS Monday and try it again in a whole different direction.  My Neutral this time is grey and white, with a pop of red.  But, then I added some brown for the stick, and bluish "ICE" looking background, so I guess I didn't quite follow the rules again this time either :)  Oh well, I did get a fun page done!!  I used the "Game Day- Hockey" download for the hockey themed words down the side of the page, as well as the "Hockey is Life" download for the puck and stick.  Like?  


In case you missed the sketch on Monday, here it is...


Monday, October 7, 2013

MDSM #35

Happy Monday MDS Friends!  Its Holly's turn to host our blog sketch today and she has a fun sketch and a challenge for us!  Use the sketch and keep your page Neutral in color.  She says we can add a pop of color to our title and journaling, or have one photo in color and the others black and white, or sepia.  Well, I have to admit, once I read Sepia my head just sort of went to these pictures of my grandmother with her sisters and brother and then I never did add my "pop of color".   I thought about going back and changing things us a bit, which is the beauty of digital isn't it?  but I like the page the way it is, so I decided to leave it :) 

For my page I used background paper and frames from the Downtown Grunge kit, and stamps from Vintage Vogue, colored in Soft Suede and Very Vanilla.    
Here is the sketch...
 
Head on over to the MDS Monday site and check out what the other team members came up with!

Thursday, October 3, 2013

Owls

As you may know based on my blog headers, I love the owl punch, both digitally and in real life.  I thought I would show you some I am working on as I create some fall blog headers. What do you think?  Cute?  Last Halloween I did a page with the owls dressed in costumes, copied from Heather Summers blog.  I thought I would dress up my blog owls for Halloween this year too.  I also want to share a tip with you.  When adding a digital owl to your page, add all the little parts, the eyes, the tummy, etc.  Work on them in the size they come up, then group the whole thing together to resize the owl.  The first time I added a digital Owl to my pages, I knew I wanted it to be bigger so I started resizing the pieces.  I had a really hard time getting the parts to look right after that, especially the eye spacing, because they are in pairs and spaced apart.  If you need to make them appear bigger while you work on them, you can use the zoom feature on your page. 
What sort of a costume will your owl wear?


Tuesday, October 1, 2013

New Card sizes at the Stampin' Up! print service!

Check out the cute new shaped cards from My Digital Studio.   Love them!!  Just in time for the Holiday Season!!  Design the front and back of these cute postcards!!
 
 
Sized at 5 x 7 you can showoff some great photos or add lots of details!  Prices start at $2.25 for individual cards, and prices go down when you order multiples.   I feel a Scalloped Christmas card is in my future!!